Thursday 6 December 2007

molasses cookies


My first memory of molasses is from childhood when my mom used to actually drink blackstrap molasses. She would have her cup of black motor oil looking goo, while I so dutifully practiced piano in the basement of our house. My mother was always there, telling me when I messed up and then would take a small, painful looking sip of her black goo. This was when she was pregnant with my sister and opted to go the natural route and give birth at home. Her midwife prescribed blackstrap molasses to help with her low iron levels. So there was little me hunched over the piano in our cold basement pounding out Mozart and Bach while my mother, big belly and all, drank molasses out of her coffee cup reading, "All that Jazz". Being a particular sort of child, I was always off in my own world daydreaming of Barbie, permed hair and anything glittery. To get me out of my daydream and onto what I was doing, my mother would often shout at me, "You're moving slow as molasses...hurry it up!". I imagine some of you heard similar things, hopefully not conditioning you to loathe molasses (or treacle depending on where you are from)

Many years later I encountered molasses again in a fruit cake recipe. I bought it, used it all and did not give a second thought to molasses. Until....my friend Carrie (pumpkin doughnuts partner in crime) saw some molasses cookies in a coffee shop the other day and asked me to make her some. I thought it was the most brilliant idea of something for me to bake in a long, long time.

I consulted many recipes for this one you see here, but not one suited me just right so I made my very own. Upon doing some research on molasses I found it's one of the most nutritional sweetners out there. High in potassium, calcium, vitamin B6 and as mentioned earlier, iron, it makes a perfect addition to sweets. It's slightly acidic and too much will over power your food, but just the right amount can add a wonderful depth to baked goods, not to mention good nutrition to boot!

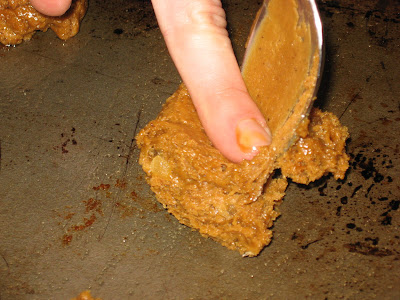
Let me give you a little warning here, this dough it majorly sticky. Like, gorilla glue dough. I found it impossible to roll, cut into shapes, or do really anything but pry off a spoon and mold into a little ball. That being said, the taste and texture is absolutely right on and I refuse to change anything about the recipe just to make it more malleable. Besides, it's really fun to roll up your sleeves, grab some spoons and roll out little mounds of joy. Roll the edges on the greased pan so they are rounded, but it's OK to leave the tops a little spiky for a homemade effect. If you desire a more perfect looking smooth, rounded cookie, roll both the sides and top and bake with the greased side up. Sprinke a little turbinado sugar on the tops right after baking for a sparkling effect. Grab a cup of tea and you are set to go; especially if you are sitting on a comfy couch and a nice thunderstorm is roaring outside.


flour mixture:
5 C all-purpose flour
1 T aluminum free baking powder
1 T baking soda
1 tsp salt
1 tsp ground cloves
1/4 tsp ground mace (optional. could add some cinnamon too)

a handfull or so of turbinado sugar for sprinkling after baking (optional)

liquid mixture:
1 C organic unsulphered molasses
1 C vegan brown sugar
1/4 C coconut butter
scant 1 C vegan milk subsitute or water

sift together the flour mixture in a separate bowl and set aside

beat together coconut butter and brown sugar, about 1-2 minutes. add molasses slowly (slow as molasses...)mixture will turn into a nice shinny brown and will smell absolutely wonderful

slowly incorporate flour mixture into the liquid mixture, alternating flour and vegan milk to form a nice sticky dough

refrigerate the dough for at least an hour, up to a day

pre-heat oven to 375 degrees

plop the dough onto a greased cookie sheet making sure you round off the edges. i simply rolled the edges on the greased sheet and left the tops a little spiky

bake in pre-heated oven for 10 minutes

eat absolutely at once! will stay good in a covered container for a few days...if they last that long.

makes about 2-3 dozen, depending on size of cookie

Saturday 24 November 2007

mincemeat pies


Frist off, I hope everyone had a lovely Thanksgiving and was able to eat, eat and eat and drink and be merry. 'Tis the season whether you like it or not. I have mixed feelings about the holidays, part nostolgia, part hating the stress that comes with this time of year. However, rather than just sit and wallow in my own holiday hating attitude, I have resolved to make it better this year, perhaps better than ever. This resolution came about the day after Thanksgiving when I was taking it easy at my house, drinking a glass of wine and reading a book. All of the sudden I was aware of the looming dark cloud of Christmas off in the distance and had the sudden urge to run and hide under the covers. Instead, with a great deal energy, I pulled myself off the couch, poured another glass of wine and set off to my kitchen for some baking therapy.

I wanted to make something Christmasy, but not over the top. Nothing with sparkles or glitters or extravagant frostings. Something simple that evoked a feeling of comfort. Rumaging through cookbooks and random printed recipes I found exactly what I had been looking for in mincemeat pies. I say pies, plural, because I made them in a muffin tin to creat cute little pies, however, you of course could make one big mincemeat pie and it would be delicious all the same. I made these last year for a party with my friend Alex, who remembers mincemeat pie from growing up in Britian, and I have conveniently made them my own tradition to be excited about!

Traditional mincemeat pie has meat in it and traditional pasty crust has dairy in it; but here, you will find none of that. Extra apples in the filling make for a dense, rich mixture without using suet (a hard, saturated fat used a lot for those birdseed thingys). Vegan shortening and butter is available in health food stores but I actually found mine at Kroger in the health food section. I considered using a whole wheat crust like the one for my sweet potato pie, but I thought that the color and texture of one with white flour and vegan shortening would go much better, despite the fact that it is less nutritious. (Sorry)

So into the kicthen to whip up some mincemeat pies and combat the holiday blues. It's my new tradition- all my own. Nothing to do with childhood memories, ex-boyfriend memories, feeling alone while everyone else is wearing puff paint sweatshirts and singing carrols...all gone thanks to mincemeat! OK, I'm sort of kidding, and sort of not. It's important to have a tradition all your own if the holidays get you down. These things are super easy and cheap to make, it makes a lot and stores for a long time and it makes your house smell absolutely wonderful! Like one of those Christmas spice candles from Target, only better! It's the cheapest therapy I know.

I adapted this recipe from "How to be a Domestic Goddess" by Nigella Lawson. The filling I made straight from the book, but the pastry I adapted to be vegan using a few different ingredients. I hope you try these this year and enjoy sharing and nibbling on these tasty little unassuming creations. If you live in the South like I do, people may look at you a little funny when you present mincemeat pie, but once they taste it, all of that weirdness is forgotten. Once the filling is made it stores in the fridge for a couple of weeks, and the pastry can be stored in the freezer for a couple of months. This is handy to have stored away to make fresh baked goods for guests or a spur of the moment party. Once the mincemeat is cooked and pastry pulled together, the rest is a breeze. Making you look and feel stress free. Here's to a happy holiday season without the pressure and stress- just enjoy what you cook and eat and all will be well!

you will need these:
large sauce pan
large mixing bowl
wooden spoon
2 muffin tins (or 3 small tart pans)
biscuit cutter about 2 inches in diatmeter
rolling pin (or an empty wine bottle)

Nigella's suet-free mincemeat recipe as it appears in her book:

1 C plus 2 T dark brown sugar
1 C plus 2 T medium-dry hard cider
2 1/4 pounds tart cooking apples, peeled, halved, and quartered
1/2 teaspoon mixed spice
1/2 teaspoon ground cinnamon
1 C plus 2 T currants
1 C plue 2 T raisins
1/3 C natural-colored glace cherries, roughly chopped (I used unsweetend dried cherries)
1/3 C blanched almonds, fairly finely choppped
rind and juice of 1/2 lemon
6 T brandy or rum
1-pint or 2 1-quart canning jars (my note:if not using all within a couple of weeks, there is no need to can this)

In a large saucepan, dissolve the sugar in the cider over a gentle heat. Roughly chop the apples, and add them to the saucepan. Then add all the other ingredients except the brandy or rum, and simmer for 30 minutes or until everything looks pulpy. Take off heat and when it had cooled a little, srit in the brandy or rum. Spoon into sterilized jars (my note: or make little mincemeat pies!)

makes 4 pounds


Pastry crust (veganized by me) adapted from Nigella's book

1 2/3 C cake flour
1/4 C vegan non-trans fat vegetable shortening
1/4 C cold vegan butter such as Earth Balance brand
juice of 1 orange
pinch of salt

Not Nigella's instructions......

Put flour and salt into a large mixing bowl and work in shortening and "butter" small bits a time until it creates pea size crumbles. Work fast making sure to keep the ingrdients cold. Add the juice of an orange and mix until it comes together into a dough. Knead a couple of time and put it in the fridge to rest for at least 30 minutes.

Now, how to assemble all of these words and paragraphs into a sensible recipe and ultimatley into little tasty mince pies:

Make the pastry dough as decribed above and let rest in the fridge

Make the mincemeat as explained above and let it simmer and fill your house with wonderful smells for at least 30 minutes.

While the mincemeat is stewing:
Pre-heat your oven to 425 degrees

Pull pastry out of the fridge and roll out until fairly thin, but still durable. Perhaps 1/8 inch thick. Using your cookie/biscuit cutter (or jar, coffee cup...what gets the job done) cut out circles and press them into your muffin or tart pan. You might want to experiment with differnt sizes to make sure there is enough of a lip to creat small pies. The bigger the better.

Next, fill the little pies with the mincemeat (about a teaspoon- i love to go all out here and put lots of filling in, which always results in messy little pies----which is no good)

Bake in the pre-heated oven for 10-15 minutes or until browned on the edges.

Alternative assembling procedure:

Roll out pastry and cut circles with larger cutter, then make smaller circles to create little "hats" for the pies. So it's like mincemeat is just barely showing from underneath. OR, get creative with little stars (like Nigella) or any other top you can think of. But don't wear yourself out with this, making plain pies is still just as enjoyable!

Serve with a light dusting of powdered sugar (totally optional) and mulled wine (not quite as optinal)

Cheers to a wonderful holiday season and creating new, wonderful traditions!

Thursday 8 November 2007

sweet potato pie


I always forget that sweet potatoes are really good for me. In fact, they are the most nutrient packed vegetable around. This strange little oblong tuber contains complex carbohydrates, protein, vitamins A and C, iron, calcium and fiber. And the darker the interior, the more beta carotene it has. Not to mention it is absolutely necessary when speaking of southern food culture and cuisine. No proper southern meal served in the months of October to December is complete without a big pile sweet potates. Unfortunatley, a lot people insult this vegetable's integrity by smothering it in marshmellows, butter, brown sugar....OK, maybe not insult- because these things are pretty tasty, but they certianly compromise the nutritional benefits. However, if left to speak for themselves, sweet potates make quite a good argument as to why they should be left alone, or adorned in a more wholesome way. The sweet potates I have been getting with my weekly CSA basket are so low maintenance that all it takes for them to be ready is to be sliced with a knife and simply boiled or baked. They carmelize all on their own when baked and when paired with savory dishes, they almost overpower the dish with their sweetness. I saw this as their cry to be mashed and put in a pie crust.

Pie crust. Of course, you can buy pie crust, even natural whole wheat pie crust and make a tasty pie that everyone will love. But why? If you are going to make pie, go all out and commit to the whole shebang. Dawn your apron, roll up your sleves and turn on some pie-making music. I promise it will fill a void in your soul that would otherwise be left empty by using a pre-made crust. Being the complete baking dork that I am, nothing gives me greater pleasure in the kithen than waking up early on a fall morning and making pastry crust in a cool, dimly lit kitchen. I'm guessing you do not share this desire (if you do, please get in touch with me...) and want something a little more practical. I found practical for you and even found it with nutritional components to boot!

The filling used in this pie is just simple, quality ingredients. Organic sweet potates, vegan milk, agar (sea vegetable used to thicken) and pure maple syrup. Spices are optional. I chose to bake the potatoes for a sweeter, roasted, flavor and left the skins on in the finished product, creating a more rustic filling with nice texture. If using organic potatoes eating the skins is not bad, in fact, it's more nutritious and tasty. If you are not using organic potatoes, maybe consider peeling them to try and lower the pesticide intake...oh, just buy organic! The idea behind this pie is to let the sweet potato shine- this is its solo and should be respected as such. Choose the best quality potatoes you can find. The better your potato, the better you pie will be. The crust is a recipe taken from one of my favorite cookbooks, "The Balanced Plate", by Renee Loux. It's a great crust that requires little maintenance. Just mix the ingredients and press the crust directly into the pie pan. No resting, chilling or dealing with annoying sticky plastic wrap. I have typed the recipe for you exaclty as it appears in the book (minus her introduction and nutritional facts). I hope you enjoy making this pie as much as you enjoy eating it and sharing it. Simple, honest and tasty is the motto here.

you will need these:
aluminum foil
baking sheet
mixing bowl
small sauce pan
9 or 10 inch pie or tart pan
potato masher or a large spoon

for the filling:
1 1/2- 2 pounds organic sweet potatoes
2/3 C vegan milk of choice (i used plain soy milk)
1 1/2 T *agar flakes (found in natural health food stores in the seaweed section)
3/4 C pure maple syrup
1/2 tsp sea salt (optional)
1/2 tsp all spice (optional)

*agar can also be used to make vegan "jell-o" and pudding. however, if seaweed scares you, or if you don't want to splurge because it can be kind of pricey, use 1 T arrowroot powder instead. just warm the milk, don't boil it and dissolve the arrowroot at the same time during the directions you would prepare the agar. (no simmering necessary, just put it in a bowl) the pie might not be as firm, but i'm sure it will be just as tasty.


the crust as it appears in "The Balanced Plate": (extra detail and description are left out for the purpose of maintaining a somewhat short post, however, i have included everything necessary to make the crust and have kept it word for word)

"Flaky Pie Crust" (pg. 341)

1 C unbleached whole wheat pastry flour
1 C spelt flour or additional whole wheat pastry flour
2 T organic granulated sweetener, such as organic evaporated cane juice, organic sugar or brown sugar, Sucant, or maple sugar
1/2 tsp baking powder
1/4 tsp finely gound sea salt
8 T cold-pressed coconut butter, palm oil, or organic vegetable oil, such as grapeseed oil or safflower oil
1 T maple syrup
1 tsp apple cider vinegar
3-6 T filtered water

Pre-heat oven to 350 degrees

sift the flours, granulated sweetener, baking powder, and salt into a bowl.

mix in the coconut butter or oil, maple syrup, vinegar, and 3 tablespoons of the filtered water, first with a wooden spoon, then with your hands until dough forms. If the dough is too dry, add another tablesppon or two of water.

press evenly into a 9 or 10 inch pie plate.

if you want to roll, flatten the dough into a disk on a piece of waxed paper large enough to wrap the dough in and refigerate for at least 30 minutes. roll the dough between two sheets of waxed paper. transfer the rolled dough to a pie plate. lightly flouring the surface of the dough and folding it in half makes the transfer easier. press the dough into the corners of the pie plate or tart pan. trim any excess dough from the rim of the plate or pan. prebake the crust or fill and bake pie as directed.

note: the dough will keep fresh in the fridge for 2 days, or sealed in a bag or container and frozen for a month or two. if fressing, thaw in the fridge for a few hours before pressing or rolling.


to assembe the pie in an efficient and timely fashion:

pre-heat oven to 425 degrees

wash the sweet potatoes really thoroughly and poke each one several times with a fork

wrap them all together in a piece of tin foil and bake until extremely soft. this could take and hour or so

meanwhile, make the crust from the recipe above and store (in the pan) in the fridge

once the potates are nice and mushy, unwrap them and place them in a bowl to let them cool. lower the oven temperature to 400 degrees

at this point, you may start pre-baking your crust if that is what you choose. pre-baking it will give it more of a nutty flavor, but is not necessary

pour milk and agar into saucepan and bring to a boil

lower temperature to simmer and stir continuously for about 10 minutes or until all the agar is disolved

pour the milk into the bowl with the potatoes along with the maple syrup and spice and mash until nice and smooth (you could also put this mixture into a food processor or blender and blend until smooth. my blender sucks and did not blend properly, so i ended up mashing. the end result of an un-blended mixture is more rustic with a bit more texture from the soft skins. i highly recommend mashing to blending)

plop mixture into pie crust and bake for 20 minutes at 400 degrees

lower the temperature and bake for another 35-40 minutes at 350 degrees

cool completely before slicing

stores in the refrigerator for a couple of days

serves 6-8

pairs well with dark rum, a brisk fall evening and a couple of best friends

Sunday 28 October 2007

granola bars


So of course when Tanner and I decided to go camping, what I was most excited about was planning the menu. How would we sustain ourselves out in the middle of nowhere fighting freezing temperatures and scaling down mountains? When we are huddled around the fire mending small wounds and re-telling the story about the giant bear, what would we desire to munch on? What's light and tidy and small and requires no preparation so we can eat and run? It has to be tasty. And it has to be healthy.

With a little cooperation and team work, we worked out some food solutions. A couple of dehydrated "dishes" such as onion bread and veggie patties. A raw cocktail sauce for dipping and cinnamon- almond truffles for dessert. Fresh fruit and 5 gallons of water. The only thing we cooked for the trip were granola bars. They were a last minute decision on my part. Tired and cranky from a long week I was looking for the easiest way to make more food for the trip. I really just wanted to throw a bunch of stuff in my mixer and hope for a miracle. And for the most part, that's what I did.

This is like one of those everything but the kitchen sink type things where anything goes. I made these late at night, randomly grabbing ingrdients off the shelf, and while I measured all my ingrdients so I can give them to you, that's not necessarily what you have to do. Just pay attention to the consistency of the batter. You want it full of goodness, but there needs to be a binder so they don't crumble and you end up eating it as cereal (which would not be such a bad thing..). Peanut butter, tahini and agave nectar worked for me. Maybe try another nut butter or date paste. Nice and sticky.

As Tanner and I approached the fierce mountain, we passed a cute little campsite on the way and decided just to stay there. How can you not camp somewhere named "Piney"? And while all of our friends and family insisted we would freeze to death, instead we built a nice fire and sat there comfortably in our jeans and sweatshirts. We munched on granola bars not while mending wounds, but while drinking cheap red wine and listening to our neighbors radio play Dolly Parton, Robert Johnson and Johnny Cash. We were too hungover to scale the mountain, however, we felt just fine to take a peaceful 5 mile hike through the woods and carve our intials in a tree. I'm going to be honest here. We stuck to our menu just fine, but we had to taste the local flavor and try the all you can eat fried catfish buffet. Which completey satisfied my soul, but made me even more grateful I had yummy, healthy snacks for the rest of the night. I should really mention if I didn't before that yes, they are healthy, but better than that they taste superb!


you will need these:
one large mixing bowl
wooden mixing spoon or electric mixer
9 x 13 inch baking dish
rubber spatula (handy, not necessary)

2 C rolled oats (the instant kind)
1/4 C each, pumpkin seeds, dried cranberries, dried dates, shredded coconut, cacao nibs
1/2 C natural creamy peanut butter
1/4 C tahini
2 T olive oil
1/4 C +3 T agave nectar (if you are not vegan a little honey might be nice too)
pinch of salt (optional)

pre-heat the oven to 350 degrees

place dry oats and pumpkin seeds in your baking dish (ungreased for now) and let them toast for about 8-10 minutes or until oats are golden brown.

meanwhile, cream peanut butter, agave nectar, tahini and olive oil together until nice and creamy

add the oats first then add all other dry ingrdients and mix until well combined

grease the baking dish with olive oil and plop the mixture in and press down until it's flat and tightly packed

bake at 350 degrees for 15-20 minutes or until oats are very golden and browning on the edges

when it comes out of the oven press down with spatula one more time to make sure it's as tight and flat as it can be

cool completely (i know, this is hard) and cut into little squares for a handy little snack

Monday 8 October 2007

baked pumpkin donuts


These donuts had very high expectations to live up to. All week long at work my friend Carrie and I had been talking, emailing, and sharing recipes for baked donuts. When conversation was at a lull during lunch we would cheer each other up by talking about our big day of making pumpkin donuts. When work got a little too stressfull, we reminded ourselves- with a precise countdown- of how long we had until we made donuts. This week was all about the pumpkin. And donuts. And why not, really? We planned an entire pumpkin afternoon. First we made the dough and left it to rise while we walked to a nearby taproom and drank pumpkin beer and ate a delicious lunch. On the walk home we discovered a local vegetable stand with tables upon tables devoted to pumpkins and squash. As we walked home in the bright (hot) sunshine, we discussed several icing combinations for the donuts as well as what different shapes and sizes we prefered our donuts to be. Pure bliss.

The anticipation for the donuts did not leave us dissapointed when the final product came out of the oven. As soon as we came into the house we dawned our aprons and got to work. Silently, we created a working assembly line from rolling out the dough, to cutting the shapes, to moving them onto pans, to cutting out the center holes. So many pans of dough left for a second a rise! When they were nice and fluffy once more, we started the baking and icing. The first batch could not get iced fast enough. Actually, the first one we iced got torn straight in half and devoured immediatley. Ahhh....the stressfull week, the waiting, the anticipation, the doubt- whatever it was was completely washed away with one bite of pumpkin donut. I'm not saying pumpkin donuts will solve your problems or anything. Okay, maybe I am.

Inspiration and recipe adaption comes from one of my favorite cooking blogs, 101 cookbooks. All of Heidi's recipes are fool proof and she manages to make elaborate, tasty dishes from simple whole foods. I read her baked donuts recipe a while ago and kept coming back to it when trying to figure out how I was going to make vegan pumpkin donuts. I finally decided to stick with it and am oh-so glad I did. Click on the first blog listed, 101 cookbooks, over to the right under "other cyber-spaces". If your are curious about her donuts, type in "baked donuts" into the search box to see her recipe and gorgeous picture.


Make these when you have time to spare and plenty of friends around to share them with. And if you can talk a close friend into sharing the kitchen space with you, it's all the better.

you will need these:
large bowl
electic mixer with dough hook or your two arms and hands- pumped up and ready for action
clean tea towels
wooden spoon
big and small donut cutter or make do with house hold objects. for instance, a to-go container and shot glass, different sized coffee cups or biscuit/cookie cutters
parchment paper
baking sheets

for the dough:
1 packet yeast (2 1/4 tsp)
1 1/3 C warm soy milk (or other vegan milk) or water
2/3 C unrefined sugar
2 T vegan butter (Earth Balance makes a good product)
1 15 oz can organic pumpkin puree or bake your own pumpkin (squash works too) using about 1 1/2-2 C flesh
5 C unbleached all purpose flour
1 tsp cinnamon
1/2 tsp nutmeg
1/4 tsp allspice
1/4 tsp salt

for the icing:
1/2 C vegan butter, melted
1/4 C (or more) unrefined sugar
3 T brown sugar
1 T cinnamon
dash of nutmeg


first, warm the soy milk until it is warm to the touch, not hot though. pour 1/3 C milk into your desired mixing bowl and sprinkle in the the yeast stiring to make sure it is incorporated. set aside for 5 minutes.

after 5 minutes lighly mix in the sugar, butter, pumpkin, the remaining 1 C milk, salt and spices until just barely combined.

start adding flour one cup a time. when you get to about 5 cups start paying close attention to the dough. at this point either turn on the dough hook and let it do it's magic, or throw in a little more flour and plop out onto a floured surface. keep adding flour to the mix until dough starts to pull away from the sides of the bowl, or ceases to stick to your fingers. overdoing it with the flour is OK; just add some more milk or water to the mix if it seems dry. if you are doing this by hand, really give it a go. work out some frustration. throw it, pound it, punch it. i promise it likes it. with either method work the dough until it has a wonderful elastic feel. it's a ta-da! moment. i promise you will know. if using the mixer, plop the dough onto a floured surface and knead a couple of times. no punching or pounding for you though. all of this should take about 5-10 minutes depending on kneading method, temperature and how shy the gluten in the flour is being.


grease a bowl with either oil or vegan butter. i like to wash out the bowl (with warm water) i just mixed in to give the bowl some warmth which will give the yeast a little kick start.

place in a warm spot (like your oven on very, very low) covered with a clean tea towel until the dough roughly doubles in size. about an hour or so.


preheat oven to 375 degrees

when you have a beautiful mound of dough give it a good punch and let all the air escape. this is really fun, by the way. turn out onto a floured surface and roll out until it is about 1/4 inch thick. use donut cutter or make-do cutter (see "you will need these" list above) cut the large circles then place them onto a parchment lined baking sheet. then proceed to cut out the smaller holes. attempting to do this in one step will make moving them a real pain and will probably deform the beautiful circles.

again, cover the dough with clean tea towels and set to rise about 45 minutes. i like to put my baking sheets on top of my oven while it pre-heats.

when dough is nice and puffy again start baking away. bake them while you are standing right next to the oven. they should cook for about 8-10 mintues. No longer!!

let them cool for a few seconds them dip the tops in the melted butter, then into the cinnamon/sugar mixture. eat right away. share with friends. make some coffee and eat more.


Monday 1 October 2007

chocolate covered almond cookies


These cookies were created on a sleepy Sunday morning; part dream, part reality. By the time my kitchen was filled with the smell of yummy goodness, I was awake and completely excited by what I had created. It was a very domestic feeling. Domestic because of the use of almonds in the cookies. Now, don't freak out on me and resolve to never make this recipe just because it means making your own almond milk and meal. Making your own nut milk is perhaps one of the most rewarding domestic tricks out there. It sounds weird/hard but is completely easy and satisfying...on many levels. There is no subsitute for homemade nut milk- none! And you don't need fancy tools to do it either. See recipe and instruction below.

The almond flavor is really captured in this recipe due to all the true to almond elements. It's not extrememly sweet and gives a nice crunch- leaving bits of almond in your teeth, just like biting into a chocolate covered almond! It reminds me of those chocolate oatmeal drop cookies of my childhood- the kind my dad used to make by heating the ingredients on the stove, dropping them on the cookie sheet and waiting (very impatientely) for the cookies to harden. Most of the time we ended up burning our fingers and/or eating liquidy cookies because they were irresistable. But those cookies involved copious amounts of butter, sugar, milk chocolate and hydrogenated peanut butter. Good for carelfree children, not good for health minded adults. But since these non-vegan/non-healthy/artery clogging flavors developed my palete, I cannot stand to eat a mediocre, tough, tasteless, rock hard cookie just because it's "healthy". I would rather eat butter than that crap. Since I really don't want either the "crap" or the "butter", I must slave away in my tiny kitchen developing flavors reminiscent of my childhood that also meet my high standard of what a vegan sweet should be. All this said, it is not always my goal to try and copy flavors of those less desirable fattening confections. I like to develop new flavors, one's that are less shocking than tooth throbing sugaryness and an overall oiliness. I like to eat whole foods, using what nature provides to create a more balanced personal universe. Well, whatever your approach is, I bet you would like these cookies. When my personal food critic (aka, boyfriend Tanner) woke up this particular morning, shaggy haired and sleepy eyed, and popped one of these cookies into his mouth- I knew I had made bloggable and keepable cookies when his eyes light up (in a good way). He said many nice things, never taking his eyes of the cooling rack, then said, "It sure didn't make very many".

Tanner is right, this recipes yields a dozen little gems. Not nearly enough for households with at least one raging sweet tooth (that would be two in mine). However, I'm keeping the recipe as is becuase I think for a regular batch of cookies to be enojoyed with friends or at home, this amount is perfect. And remember my little post about the small yield to make yourself feel better when you have eaten all the cookies in one day! And if you don't agree with my minimalist rantings- double it!

homemade almond milk:
1 1/4 C raw and unsalted almonds
4 C filtered water
pinch of salt
*if you want more of a sweet milk, try adding a couple T's of agave nectar, cinnamon for spice, or do it up with some cocoa powder. add these elements when blending.
strainer with a square of cheesecloth
1 quart pitcher

easy, easy....just soak the almonds in a bowl with a lot of filterd water (covering several inches above almonds) for 8 hours

drain and rinse almonds and place in a blender with the 4 C water and salt. add sweeteners at this point. blend for a minute or two.

pour the mixture through the cheesecloth lined strainer putting a pitcher underneath to catch liquid.

that's it. you are ready to use that milk on cereal, in tea, or in chocolate covered almond cookies! the "meal" that is leftover in the cheesecloth needs to be squeezed and either toasted in the oven (200 degress,spared out on a pan, until dried out and crumbly) or in a dehydrator for several hours. store in a glass container in the fridge.

milk will go bad quick. if you are not going to drink it within a couple of days, i recommend freezing it in ice cube trays to be thrown in with smoothies or even made into popsicles.

the meal however will last a while if dried out properly. perhaps try throwing it in with some homemade granola??


for the cookies:

you will need these:
2 medium mixing bowls
wooden spoon
cookie sheet, greased

flour mixture:
1 C almond meal
1 C unbleached all-purpose flour
1 tsp baking powder
1/4 tsp salt
3 T cocoa powder

liquid mixture:
1/2 C unrefined organic sugar
1/4 (scant) C brown sugar
1/4 C canola oil
1/3 C almond milk
1/2 tsp almond extract

pre-heat oven to 350 degrees and grease your cookie sheet

combine together the meal, flour, baking powder, salt and cocoa powder. set aside

blend together both sugars and oil. slowly pour in milk as you are stirring and add the almond extract at the last second

make a well in the dry mixture and pour in the liquid mixing until just combined

dough will be stiff. using a spoon or your hands (best method) roll cookies into 1-2 inch in diameter disks. flatten slighly

bake for 10 minutes and 10 minutes only!! cookies will be very soft and you will tempted to bake them longer. trust- they will get firm on the baking sheet, or on the cooling rack and you will be very glad you took them out when you did because the fudgy texture is absolute perfection.

*this would be very ambitious for you, no? some of you probably won't even read this far, giving up at the almond milk part of the blog. if you are not convinced to make nut milk and meal, i guess (sigh) you could lightly blend up some cooking oats in place of the almond meal. however, that would make them oatmeal cookies instead of almond cookies....this is my desperate attempt to make the recipe usable for all.

Tuesday 25 September 2007

brown rice pudding


It was one of those days. Yes, those days. Where everything in your universe is off just a bit. The morning coffee tastes bitter, clothes do not fit right, simple decisions are hard to make, suddenly you remember there are 10,000 things to do and you find yourself tired and running late. Oh, it's Monday. On this particular Monday I found myself in quite a mess (for really no reason!!) and a tummy ache to top it off. After what felt like moving through mud trying to gain focus on my day I simply threw my hands up and quit before I even started. Quite lame, yes, but I accepted that fast and got right to dumping my crap coffee down the drain, putting on my pj's (which I knew fit) and made the one decision I could not go wrong with: rice pudding. There is nothing wrong with taking the time to stop and realize the small pleasures of life. It's essential. More people should throw their hands up in the moring and take a day to themselves to apprechiate what life has to offer and just slow down. You know those people that need this desperatly. Maybe I am just trying to justify my lazy behavior? Maybe. But can I tell you how great it was to take a day to myself? I still felt pretty crap physically but emotionally I was considerably more stable and relaxed. Or course, it's impossible to put life on hold, but it is possible to take the time to gain perspective- to step back and realize that everything you were stressing about maybe is not so grandiose that your world might fall apart. Maybe things really are falling apart and you need to take the time to take care of yourself- so you can be calm and clear in times of distress. Whatever it may be, maybe even nothing at all, making a pot of creamy rice pudding will, at the very least, send you into temorary nirvana. And it's times like these that our bodies and minds are a little out of balance and can lead to stress eating- which is normally not so healthy. Eating this particular rice pudding will not classify under unhealthy desserts. Brown rice lends a wholesome base while lemon and ginger help detox the body and aid in digestion. The small amount of sugar will not send your blood sugar soaring and crashing. It might test your patience just a little becuase it takes a while to bake, but there is nothing really to mess up with this recipe. This rice pudding can turn one of those days into a good day. Making something healthy and tasty is quite an accomplishment. And if that's the only accomplishment that is done for the day, that's perfectly OK.

This recipe demands quite a bit of time from you but don't fret. It's a lot of time, but not a lot of energy. This is one of those dishes that can cook while you are making dinner, reading the morning paper, or enjoying an afternoon cocktail (or three- you have the time, right?). Also, feel free to suit it to your tastes. The basic measurments are below, but feel free to use soy milk instead of coconut milk. Maybe throw 1 Cup golden raisins or pistachio's....or both! If you can cook rice, you can make the most delicious brown rice pudding ever. Oh, a note about rice. Try to use the best rice possible. Don't skimp if you can help it. But....I'll just say off the record that any type of rice will do. I like the flavor basmati adds, and brown rice has more nutrition, but feel free to experiment with short grain brown, jasmine, and of course in a pinch plain old white rice will do and most certainly nourish your soul.


you will need these:
pot for making rice (or a rice cooker)
favorite casserole type dish to go in the oven make sure it has a lid- or in a pinch use some foil to cover
wooden spoon


1 C brown basmati rice cooked according to directions on package which should equal approximatley 2 C cooked rice
1 T coconut butter (optional)
14oz can regular coconut milk
1/2 C agave nectar
1/4 C organic unrefined sugar
zest and juice of 1/2 organic lemon
3 inch piece of ginger, grated --a cheese grater works fine. or, just mince it
1/2 tsp cardamom powder
pinch of salt

1/2 C grated, unsweetened coconut flakes (optional)

pre-heat oven to 375 degrees

to make the rice, add the coconut butter (if using) and a pinch of salt. canola oil can be subsituted for the butter

once rice is done take off heat, keep it covered, and let it sit for 15 minutes

fluff the rice with a fork then add the coconut milk, agave nectar, zest and juice of lemon, grated ginger, cardamom powder and salt

mix well with a wooden spoon, press down flat with a wooden spoon, put a lid on it and stick it in the oven for 1 1/2 hours.

i know it's against the rules to open the oven while baking, but go ahead and break the rules this time and open it to stir the rice about three times during the cooking process, but not before the first 30 minutes. all kinds of rice and ovens and baking dishes vary so it may take a little more or less time. it's impossible to overcook it. if for some reason it does look dry, try adding some more coconut milk, vegan milk of any kind or if all else fails, water will do. the point is to get the rice as soft as possible.

remove from the oven when done, give it one more stir and let it rest, lid on, for at least 20 minutes.

after that it is fair game. eat it or garnish it. be carefull not to burn your mouth though!

to garnish and add a little crunch, sprinkle the shredded coconut on top and broil (i crack the oven while doing this- what a shame it would be to burn the coconut) for 2-4 minutes.

keep it in the refridgerator for a couple of days- if it lasts that long

it will serve about 6 people depending....oh, and it makes for a breakfast of champions.

and a note about the picture: this vintage le creuset pot was a donatation made my friends Julie and Giles. They called it their "river pot" becuase it is very stained. please know that making this pudding will not do something like this to your pot.....just thought you might like to know. i thought the picture looked "rustic" when i took it- now i'm not so sure. i don't really care thought 'cause the proof is in the pudding.

Sunday 16 September 2007

wheat-free chocolate chip bread


Britney and I have know each other since the third grade. We immediatley became best friends in Mrs. Berry's class. When our parents met my mom asked her mom in a hushed, concerned, voice, "Does Britney have immaginary friends?". "No", replied her mom, "She just reads a lot". Obviously my mom thought I was a little off for creating my friends instead of just making them in real life. (True story: my first imaginary friend's name was macaronni) But when Britney came along there was no longer a need to have imaginary friends or for her to immerse herself in books. We were inseperable. Living in a small town and being (at the time) only children, we clung to each other like twin sisters. Since the third grade we have grown our seperate ways and live much different lives now. But one thing remains the same, we are still very much like sisters who can't get enough of each other. This makes baking and taking photos of our baked goods a synonomous effort, like two energys moving as one in the kitchen, creating doublely good stuff.

We were on a mission to make vegan m&m cookies. I was disheartend to see "whole milk powder" in the ingredients list in the natural, m&m type product. "Well, should we go for a classic chocolate chip cookie" Britney asked. Of course, what else would we do??

Sifting through several cookie recipes, vegan and not vegan, we soon became anxious and went into the kitchen, beers in hand, to create the perfect vegan chocolate chip cookie. While Britney measured out flour, I measured oil and sugar. We worked in silence, focusing all our positive energy into the wonderful cookie dough. Ummm....cookie dough? Right. "Okay, just 1/2 C more flour." Staring in disbelief into the mixer while we watched our beloved batter refuse to thicken up. Right, lets just try them out, see how they do. More like pouring crepe batter onto the cookie sheet we kept our spirits high until the timer went off and we peeked into the oven. A mess of batter splayed out on the pan looking more like pancakes with an identity crisis. We stuck the rest of the batter in the fridge to chill and tried again 20 minutes later. Still, these babies did not like the free from of the cookie sheet. Determind not to let the rest of our batter go to waste we filled the last of the batter into two little springform pans. We sat in the kicthen, chatting away and sipping our beers, while a miracle happened in the oven. Surprisingly enough we still had a positive energy about whatever it was we were creating. While we talked we unconciously munched on the cookies that had refused to become cookies. They became solid on the cookie sheet and even though they were thin as crepes, we were both in agreement that the taste was right on. The cakes came out and we immediatley knew that our positive efforts had created a wonderful thing. I guess we were listening to our Buddhist talk earlier that morning when we heard a lecture on not letting ourselves, along with our perception of the world, conform to a certain identity. Things change every moment and nothing will ever stay the same. Cookie dough should not have to be cookie dough if it's time has passed and needs, instead, to be bread batter. It is up to the baker to roll with these changes and become fluid cooks knowing that soon, cookie dough, turned into bread batter, will one day make excellent crepes... and so on. Or maybe that's the beer talking combined with my whimsical recipe writing.


Try this recipe as muffins, mini-cakes or a whole sweet bread. It will make approximately 2 dozen muffins, one 8x8 (or thin 9x13) bread or several small cakes such as the small springform pans used here. Get creative and let the batter speak to you. Becoming one with what you are cooking and preparing to consume is key to creating perfect food.


you will need these:
2 mixing bowls
wooden spoon
rubber spatula
muffin tins or cake tins

flour mixture:
3 1/2 C spelt flour (you can make this with regular all-purpose flour, just add a couple of tablespoons extra flour)
1 1/2 tsp baking powder
1/2 tsp salt
3/4 C organic unrefined sugar
1/8 tsp cayenne pepper (optional, added for bit of mystery)

liquid mixture:
2/3 C canola oil
1 C agave nectar
1 1/2 T ground flax seed blended with,
1 C almond milk
2 tsp alcohol free vanilla extract

1 C vegan chocolate chips

preheat oven to 350 degrees

blend the flax seeds and almond milk together and set aside

combine the flour, baking soda, salt and cayenne pepper (if using)

cream the oil, agave, and sugar until incorporated and add the flax/milk mixture. then add vanilla at the last second

putting in a cup at a time, slowly mix the flour mixture into the liquid until just combined. add chocolate chips and give a couple more stirs

pour into desired tins and bake for 30-40 minutes. a little less time for muffins, though

when it has come out of the oven, the top will give a nice shine which is what i like most about this little treat

p.b. (that's post-blog, fyi) as with the Ultimate Brownies I posted last month, there were no special additions to the batter. However, for that extra special crunch try adding 3/4 C nuts of your choice (perhaps walnuts?) or 3/4 C dried, unsweetend cherries. If you do get frisky and add a little something else, be sure to let me know what it is so I can try it too.

Saturday 8 September 2007

rosemary cornmeal cake


Qutoes from this mornings Research and Development team meeting:

Kyle: "I like this, it's sweet, but not too sweet. I can't decide if I should call it sweet or savory"

Carrie: "It's not heavy like cornbread and sitting like a rock in my stomach. You really got the perfect amount of oil in this."

Kyle: "What are you going to pair this with? My first thought is it would go great with chicken. I mean, well, that's not what you will do with it I'm sure, but, okay, maybe roast vegtables?"

Carrie: "Yeah, this would go great with fish.....I'm going to eat all of this right now."

Kyle: "Me too- hey this would also be great for breakfast. Do vegans eat orange marmalade? Like spicy marmalade? It would be great for breakfast with that on it. Hey, are you going to put that on your blog? The marmalade part?

Kyle and Carrie are some members of my Research and Development team, also know as my friends ready to eat my baked goods and tell me all about it. This conversation took place in our workroom this morning as we were dreading the fatefull three hours of work that were ahead of us. The cornmeal cake lifted our spirits and gave us something to talk about instead of the usual complaining about work. I stood there in amazement as they both carried on a good 5 minute converstation about how the cake tasted, what they would pair it with, and how it should be served. Ummm, where are their food blogs I want to know? I love that they both immediatley paired my semi-sweet vegan cake with meat. How hilarious! Maybe it's the rosemary?

I, too enjoyed this cake as much as my "team" which is why I wanted to share it with you. It's like cornbread but not, like a cake but not. It kind of makes it's own catergory hovering between sweet and savory, breakfast or dessert, plain or adorned (with spicy vegan marmalade??) This is a classy cake, one of those you can feel comfortable taking into any situation. A vegan cake paired with meat? Now that's compatibility.

I was set on putting rosemary in something I baked. Maybe it's because the seasons are starting to change and I feel a need to put spices and herbs in just about anything I cook. Bay leaves have started appearing in my cooking at least once a week and I just simply cannot get enough sage. Also, in a couple of months it will be the right weather for cornbread with hearty stews and chilies. However, I must live in the present. The weather is still warm. Although I am looking forward to pumpkins, hearty soups and dense breads, I must be mindfull of my current situation and remember that it is still hot outside and eating these things would promote (even more) laziness. I wanted something sweet, not cloying, that reminded me of bright weather- no matter the season. Incorporating herbs into your sweet baking is a wonderful thing. Herbs like sweet things too, just as much as you do.

you will need these:
2 mixing bowls
8 inch cake pan
wooden mixing spoon

flour mixture:
2 C cornmeal (organic if possible)
1 C spelt flour (found in the health food section or health food store- you could use all purpose, just take out 2 tablespoons seeing as spelt flour is a bit more dense)
2 tsp baking powder
3/4 C vegan, organic powdered sugar

liquide mixture:
1/3 canola oil
2 C club soda

1 T fresh rosemary or 3/4 T dried rosemary (chop it up into really small bits. i did not do this the first time and believe me it was not fun picking sticks of rosemary out of my teeth)

*try adding the zest of an organic lemon. i really regret i forgot this part and will be sure to do it next time. would also look great as a grarnish

pre-heat oven to 350 degrees. grease cake pan and set aside

blend together flour mixture making sure all the bits of flour have been crumbled up

in a seperate bowl whisk together oil and club soda

make a well in the flour mixture and pour the liquid into the dry flour. mixing as you go (adding the rosemary and zest at this point) and making sure not to overmix

----the batter at this point will be very, very wet and you will have a strong urge to add more flour and thinking i must be crazy with my recipe writing. this is not true. do not add more flour whatever you do. even i thought i was crazy when i poured it into the pan. but it works, please trust me.

pour into greased pan and bake for 30-40 minutes until a toothpick comes out clean. also, you can always trust your nose. when it smells the most aromatic, it's probably ready to come out.

when it's cooled and you are ready to serve it, try dusting some powdered sugar and lemon zest on top for a beautiful presentation. or perhaps you were going to go for the spicy vegan marmalade?

serves 8-10

Monday 3 September 2007

maple cake


When searching for a cake to make for my friend Chris's birthday I knew it had to be spectacular.

Chris arrived as I was icing the cake and seemed impressed with my beautiful golden, maple creation. It was adorned with pecans then tucked away for after dinner. Dinner? I'm going through this phase where I like to use just the ingredients I have on hand to make meals. It's getting kind of tricky now because the pantry is pretty sparce, but I'm using things I didn't even know I had and coming up with creative ways to use those foods that I'm not sure why I bought in the first place. Not allowing myself to go to the store for anything (except items for baking, of course) is a real challenge. I had the bright idea to make fried spring rolls filled with bean thread, spinach, egg, and spicy garlic sauce. A butternut squash soup and roasted potatoes. This sounds way more impressive than it really was. I showed Chris how to roll the spring rolls then I set off on cutting potatoes and putting garlic in the soup. Once the oil was hot enough to fry our delicate creations, he asked, "Have you ever done this before?" Well, I had never fried spring rolls but how hard could it be? The spring rolls were far from perfection but we looked pretty professional, both of us wearing aprons, armed with spatula's, and me, with goggles on. We were suddenly transported to a television set introducing ourselves and our little spring rolls using phrases such as, "Looking for that nice, golden brown", and "You want it to have a good crunch". We both did a great job consuming spring rolls, dripping with oil, and making more of a splat sound when biting down than "crisp!". After that I decided on no frills whatsoever. The soup had all of 4 ingredients and the potatoes were just that. Chris was a good sport and encouraging of my lamest meal ever. What on earth made me think that just because I can bake a cake I can fry little rice paper wraps to a golden perfection?? Maybe one can bake spring rolls?? Hmmmm....I think Chris deserves another birthday dinner, don't you?

Thank goodness I made that maple cake. After dinner my palate needed some love. Just on time for cake, my boyfriend arrived and we promptly lit candles and sang. I gave out generous pieces for the three of us and we stood right where we had recived our plates and ate in silence. "This is the best dessert you have ever made" said Tanner, who is also my food critic. "It's not vegan is it?" I did make it vegan, actually. This made me feel much, much better while standing in my grease covered kitchen and watching two grown men shove birthday cake into their mouths. My ego was saved.

Nigella Lawson gets the credit for this one. It's her autumal birthday cake from, "How to be a Domestic Goddess". I ate the "real" cake last year at a birthday party baked by my wonderful friend Miz Collins; I fell in love with it on the spot and have been craving it ever since. The vegan rendition is really similar; it lacks some of the fluff that the one with eggs provides, and the fosting is not as fluffy either. The moisture is there- amazingly- with only a bit of oil and no eggs. That being said, the taste is pefection; just straight up maple and pecans. Also it's comforting that something that tastes so luxurious is so simple in nature. Oh, and it looks stunning sitting on a cake stand. It's the perfect introduction to fall or an anytime of year birthday cake spectacular.


you will need these:
2 mixing bowls
wooden spoon
blender
2 8x8 round cake pans

for the cake:
1/2 C oil
scant 1/4 C unrefined natural sugar
3/4 C milk subsitute (I chose almond milk but soy, rice, hemp...etc. would work too)
3 tsp apple cider vinegar
3 C unbleached all-purpose flour
1/2 tsp baking powder
1/2 tsp baking soda
1 C maple syrup (preferably organic grade a or b. please don't use aunt jemima)

for the icing:
1/2 box (approx. 6 oz) silken firm tofu (like Mori Nu brand)
1/2 C maple syrup
1 T unrefined natural sugar
1 T arrowroot powder (this is to thicken the icing)
1/4 tsp salt
1 tsp vanilla extract

1/2 C chopped pecan pieces

preheat the oven to 350 degrees

grease cake pans with a little canola oil

mix the flour, baking soda and baking powder and set aside

Add the apple cider vinegar to the milk and whisk for a minute or two until bubbles from at the top. set aside

combine the oil and sugar until fully incorporated and add the milk and maple syrup

slowly add the flour mixutre until just combined. overmixing cake batters can result in a tough, too dense cake

pour into cake pans and bake for 30 minutes. the color of the cake is light and golden and might appear on first glance to not be throughly cooked- test with a toothpick to be sure

to make the icing:

put all ingredients into a blender and wiz until nice and creamy. let chill in the refrigerator until ready to use.

make sure the cakes have cooled to room temperature before icing them. the icing is a bit thin and the less the heat on it, the better it will stick to the cake.

lay one layer on a plate and poke holes in the top with a fork. pour icing generously over the top and throw on a good handful of pecans.

next, place the second layer on top, this time without poking holes in the top. pour the rest of the icing over cake. it is more like a drizzle really- let it drip down the side and try not to worry too much about covering the whole thing in icing. it looks really nice with little drips going down the side. top with pecans and you are ready to go. if this is a birthday cake, go ahead and splurge on gold candles....not too many though.

Thursday 30 August 2007

black sesame biscotti


It is always good to have some biscotti on hand. Perfectly acceptable in just about any situation from breakfast, to afternoon tea, to dessert to midnight snack. It is underapprechiated in the world of desserts usually taking a backseat to cookies, cakes, pies and brownines. Usually seen in big see through containers beside the counter of coffee shops and bakeries and almost always looking scrunched together, leaving bits of frosting and oil to skid down the side. Lots of crumbs sit at the bottom making the overall appearance seem stale and uninviting. Biscotti does not get the recognition it deserves.

The idea for black sesame biscotti came from Eric Lechasseur's book, "Love, Eric", which features delicious vegan macrobiotic desserts. The recipe he uses looks great, but contains ingredients such as kuzu and maple syrup sugar which can be difficult to find and also kind of pricey. I wanted a more basic approach so I turned to an article in Vegetarian Journal, by Debra Daniels-Zeller, on vegan biscotti. (See references below) Not only does this article give some excellent looking biscotti recipes, it has an entire section on egg replacer options as well as a little history on this wonderful, sophisticated cookie. I used the lemon biscotti recipe and adapted it for the recipe you see below.

As I was getting everything set to make the black sesame biscotti I was also in the process of dying my hair red, listening to Iggy and the Stooges, drinking coffee and being throughly excited about the beautiful, sunny Saturday afternoon. As I started to mix the dry ingredients and grease my baking sheet the mood of my apartment suddenly changed. I unconsciously went to the stereo and turned on more peacefull ambient music. Dumped out my coffee and made a steaming cup of ginger tea. Rinsed my hair dye out and slipped on my beautiful Kimono robe. That was more like it. It seemed that the delicate biscotti demanded a more serene environment even before their conception. After that things went smoothly and my kitchen was completely zen. These little biscotti are some of the best treats I have ever made. A couple of friends came over for curry later that night and the biscotti made quite a spectacle blooming out of that silver cup on my coffee table. Perfect for munching on while drinking wine and preparing dinner because they are not too sweet. And after dinner before the movie they were perfect to compliment a heavy meal laden with rich curry and rice. And coming home from the movie they made perfect (after) midnight snacks. Shall I continue and reveal how much biscotti I really ate? Well, this morning after a hearty breakfast they were just the right ending. Begging to be dunked in coffee and enjoyed on my patio. And now, contemplating ways to describe these little gems, I am munching on one thinking, "These really do go with everything"- what else can I say? Oh, yes, I might add the are really easy to make and really impressive. I also recommend trying the whole zen baking thing sometime...it certainly translates to your final product offering a little piece of sanity to whoever eats it.

you will need these:

2 mixing bowls
rubber spatula
baking sheet lined with foil

Flour mixture:

3 C unbleached, all-purpose flour
1/2 tsp baking powder
1/2 tsp baking soda

Liquid mixture:

1/2 C canola oil
scant 1/4 C natural cane sugar
flax seed egg replacer for 3 eggs (see note below)*
juice of 1/2 lemon
1/2 cup agave nectar
1/2 T alcohol-free almond extract (I was trying to be fancy here, vanilla would work too)

1/2 C black sesame seeds to add at end

Pre-heat the oven to 350 degrees and grease the baking sheet lined with foil

Combine dry ingredients and set aside

make eggs:
* flax seed replacer for three eggs. blend 3 T ground flax seeds with 9 T filtered water. let it blend for a couple of minutes until it's nice and frothy.

combine the egg replacer with the canola oil, cane sugar, lemon juice and agave nectar. beat this mixture until well combined, about 2-3 minutes. add extract at the end.

slowly scoop the flour into the liquid mixing until just combined. fold sesame seeds in being very careful not to overmix.

the dough should looks almost like yeast bread dough, like this:


from into two logs on the greased baking sheet like this:


bake at 350 for 30 minutes, remove from oven and let cool for at least 30 minutes. turn the oven temperature down to 325. once the "logs" are cool, cut them diagonaly like so:


you can see i put them on another baking sheet with holes so they can cook on both sides. this is not really necessary because you will be turning them anyway.

cook the cut biscotti, flat side down, at the lower temperature for 25-30 minutes turning them over halfway through.
eat one as soon as they are cool enough to put in your mouth- i mean, why not?

prepare to feel like an impressive bakery wizard!! which of course, you already are.

references:
biscotti article:
http://findarticles.com/p/articles/mi_m0FDE/is_2_24/ai_n13676489

and the lovely eric lechasseur:
http://www.loveeric.net/

Monday 27 August 2007

Ultimate Brownies


For those who love a good fudgy, over-the-top confection, you have just found the ultimate brownie. This brownie is different from others that look and taste the same because it lacks undesirable fats and sugars. Baking without butter, refined sugar, eggs and milk is not impossible, on the contrary, it is extremely easy. Many of the ingredients used are found in regular supermarkets and do not cost a fortune. However, as to not compensate taste and quality it is always smart to chose the best, freshest ingredients, preferably organic. In this little space of cyberspace that I claim, I will offer vegan recipes that stand up to any full fat, full sugar pastery and claim their own.

This recipe was inspired by several brownie recipes, most of them not vegan. Of the many, many recipes I read, the one ingredient that I knew I had to add was coffee. Not many asked for coffee, but after reading it in one I could not get the idea of incorporating the marriage of coffee and chocolate out of my head. And after tasting the final product, I knew I was onto something. Everything else from the usual brownie was replaced without hesitation. Oil for butter, agave nectar for sugar and unsweetend chocolate in place of regular baking chocolate which normaly contains dairy. The coffee really brings out the intense taste of the unsweetened chocolate and somehow helps it linger in you mouth. The sweetness of the agave nectar perfectly balances the bitter chocolate. When I was experimenting with this recipe I had tunnel vision for something so chocolatey I completely disregarded any type of add in such as nuts, chocolate chips (yes, it's always possible to add MORE chocolate), fruits....you get the point. To do this, simply chop up whatever your add in might be and fold it into the final mixture right before pouring it in the pan. This recipe is very forgiving and the very best part of it all is that you can eat the batter straight from the bowl without the guilt of eating raw eggs. Actually, do try the batter from the bowl. It's simply wonderful.

you will need these:
8x8 baking pan
2 bowls
whisk
wooden mixing spoon (and a rubber spatula will help too)
double boiler (or you can do what i do and place a small sauce pan or ceramic bowl atop a larger pan of boiling water)

Flour mixture:
1 1/2 C all purpose unbleached flour
3 T cocoa powder
1 1/2 tsp baking powder
1/8 tsp baking soda
1/2 tsp salt

Liquid mixture:
1/4 canola oil
1 C agave nectar
1/2 tsp alcohol-free vanilla
3/4 C strong coffee, divided
3 oz. unsweetend chocolate (vegan dark chocolate willl work too)

Preheat oven to 350 degrees and grease the pan with canola oil

Melt the 3 oz. chocolate in a double boiler. Add 1/4 C coffee when chocolate starts to melt and take the pan off the heat, stirring until just combined. Set aside to cool

Whisk together the flour mixture making sure it is free of lumps

In the second bowl beat the oil, agave nectar and the remaining 1/2 C coffee. Plop the semi cooled chocolate mixture in and beat until it is a smooth, beautiful glossy dark brown. At the very end add the vanilla and give it a couple more stirs.

Slowly add the flour mixture to the liquid by adding small amounts of the flour at a time. Mix until just combined and pour into baking pan. Bake for 20-25 minutes making sure not to overcook.

Find a nice distraction to allow the brownines to cool. Serves 9-16

*a note about the coffee. if you do not consume coffee on a regular basis, first of all, i commend you, second of all it is not absolutely necessary to purchase it just for this recipe. your favorite milk substitue will do, just keep in mind many of them add sugar so you might want to use a little less agave nectar. that being said, the coffee really does take it to another level. i'm just saying...

**and a note about agave nectar. this can be found at natural, alternative health food stores in the baking aisle. however, in a pinch maple syrup will do the trick; just try to use the natural stuff- grade a or b is fine

Subscribe via email

Enter your email address:

Delivered by FeedBurner

Subscribe Now: Feed Icon